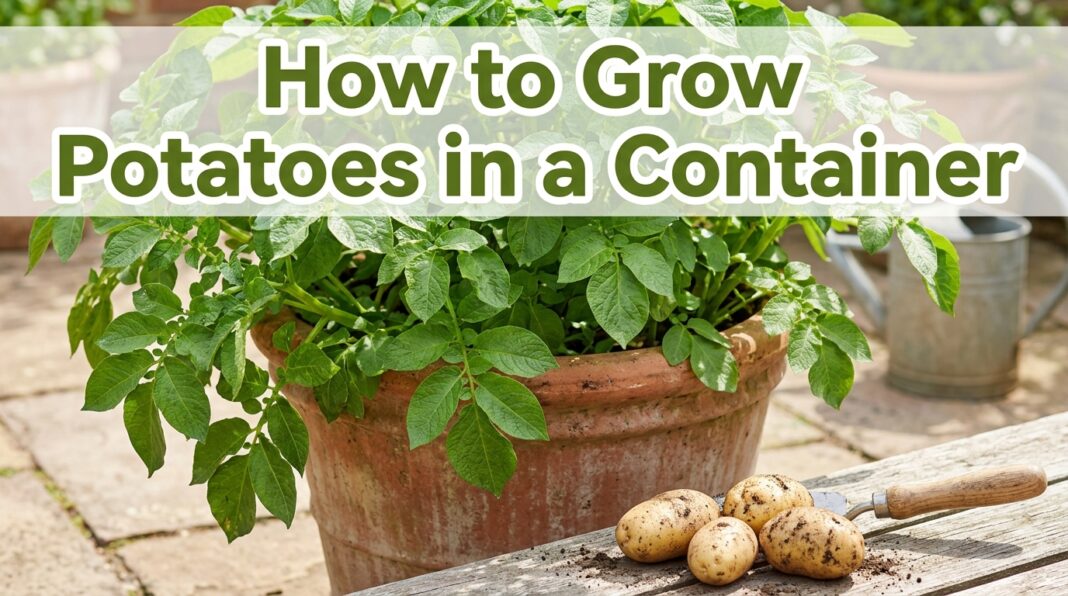
A patio, a balcony, or even a sunny spot by the back door is all the room you actually need for this. Growing potatoes in a container is one of the most forgiving ways to start vegetable gardening, and it works whether you’ve got a sprawling backyard or a single concrete slab outside your apartment. You skip tilling, you skip weeding rows, and harvest day is as simple as tipping a bucket over onto a tarp.
The trick isn’t luck. It’s picking the right container, using the right soil, and adding more soil at the right times as the plant grows. Get those three things right and even a first-time gardener can pull a surprising haul of tubers out of what used to be a plain plastic bin. Here’s exactly how the process works, start to finish.
Why Grow Potatoes in a Container Instead of the Ground
There are a handful of real advantages here, not just convenience for people without yard space.
- Better pest control. Wireworms, voles, and other soil-dwelling pests that damage in-ground tubers have a much harder time reaching potatoes grown above ground level.
- Works around bad soil. Rocky, compacted, or heavy clay soil is a common headache for in-ground potatoes, but a container lets you completely control the growing medium.
- Easier harvest. Instead of digging through rows with a fork and risking bruised tubers, you simply tip the container over and sift through loose soil.
- Mobility. A container can be moved to chase sunlight or pulled under cover if a late frost is forecast.
The tradeoff is yield. Container-grown potatoes typically produce a bit less per plant than the same variety grown in open garden soil, mostly because roots have less room to spread. For a patio-sized harvest to season a few dinners, though, that tradeoff barely matters.
benefits of growing potatoes in a container versus the ground
Choosing the Right Container
Almost any sturdy, opaque container with drainage holes will work, but size matters more than material.
Look for something roughly 2 to 3 feet tall with a capacity of at least 10 to 15 gallons. Anything much taller tends to dry out unevenly, since the top layer dries fast while the bottom stays soggy, which invites rot. Good options include:
- Fabric grow bags, which drain well and are easy to store flat when not in use
- Plastic storage totes or trash cans, as long as you drill drainage holes yourself
- Half whiskey barrels or wooden planters
- Stacked tires, though these have fallen out of favor since some tire materials can leach into soil over time
Whatever you pick, plan on roughly five gallons of soil volume per plant, so a single 15-gallon container is a comfortable home for two to three seed potatoes.
Picking the Right Soil Mix
Garden soil is not a good fit for container growing. It compacts hard once confined, drains poorly, and can bring weed seeds or soil-borne disease along with it. Instead, use a loose, well-draining mix.
A simple and reliable combination is a half-and-half blend of peat-based potting mix and quality compost. The potting mix stays lightweight and sheds excess water, while the compost adds nutrients the plants will lean on heavily later in the season.
Potatoes generally prefer soil on the acidic side, with a pH somewhere between 5.0 and 6.5. This slightly acidic range also happens to help ward off potato scab, a common cosmetic disease that leaves rough, corky patches on the skin without actually rotting the tuber underneath.
Preparing Seed Potatoes Before Planting
Skip the grocery store bin for this step. Supermarket potatoes are often treated with a sprout inhibitor and may carry diseases without showing symptoms, so it’s worth buying certified seed potatoes from a garden center or a reputable online source instead.
Look for seed potatoes that are firm, not shriveled, with small dimpled “eyes” scattered across the skin. Those eyes are where new sprouts will emerge.
- Large seed potatoes should be cut into pieces roughly 1 to 2 inches across, with at least one or two eyes per piece
- Small seed potatoes, sometimes called fingerlings, can be planted whole
- After cutting, let the pieces sit out at room temperature for one to two days so the cut surface can callus over, which helps prevent rot once planted
Some gardeners also like to “chit” their seed potatoes beforehand, meaning they set the pieces in a bright, cool spot for a week or two before planting so short, sturdy sprouts form early. This step is optional but can give plants a head start.
Choosing a Potato Variety for Container Growing
Not every variety behaves the same way in a confined space, so it’s worth thinking about maturity time and growth habit before you buy seed potatoes.
Early-season varieties typically mature in 70 to 90 days and are a smart choice if you’re working with a shorter growing season, want a faster turnaround, or plan to squeeze in a second planting later in the summer. Popular early options include red-skinned and yellow-fleshed types known for reliable, compact growth.
Mid- and late-season varieties take closer to 90 to 120 days but often produce larger tubers and store noticeably longer once cured. These are worth the wait if your main goal is stocking a pantry rather than an early summer treat.
Fingerling varieties are naturally smaller and slender, which makes them a good fit for gardeners who want a heavier count of smaller potatoes rather than fewer large ones. They also tend to have excellent flavor for roasting whole.
There isn’t a single “best” variety for containers specifically. The right pick depends more on your climate, your patience, and what you plan to cook with the harvest.
When to Plant Potatoes in a Container
Timing matters more for container potatoes than you might expect, since the seed pieces sit closer to the surface than they would buried in garden soil, which leaves them more exposed to a late cold snap.
A good rule of thumb is to plant about two weeks before your area’s average last frost date, once soil temperatures are consistently reaching above 50°F by mid-morning. If a surprise frost is forecast after planting, move the container into a garage or covered porch for a night or two rather than risking damage to young shoots.
Set the container in a spot that receives at least 6 to 8 hours of direct sunlight daily. Potatoes are sun-hungry plants, and skimping on light is one of the most common reasons for a disappointing harvest.
Step-by-Step: Planting Potatoes in a Container
Step 1: Add the First Layer of Soil
Fill the bottom of your container with about 4 to 6 inches of your prepared potting mix and compost blend. Don’t fill the whole container yet. You’ll add more soil gradually as the plant grows, a process called hilling.
Step 2: Place the Seed Potatoes
Set your seed potato pieces on top of the soil with the eyes facing upward. Space them roughly 8 to 10 inches apart so the developing plants have enough room to form tubers without crowding each other.
Step 3: Cover and Water
Cover the seed pieces with another 3 to 4 inches of soil and water thoroughly until moisture drains from the bottom holes. Keep the soil moist but not soggy while you wait for sprouts to emerge, which usually takes 10 to 14 days.
Step 4: Begin Hilling as Shoots Grow
Once the green shoots reach about 6 to 8 inches tall, add more soil, compost, or straw around the stems, leaving only the top couple of inches of leaves exposed. This step is the single most important habit for a good yield, since potatoes form along the buried portion of the stem. Repeat this hilling process every time new growth reaches that same height, continuing until the container is full.
Watering and Feeding Container Potatoes
Containers dry out faster than garden beds, especially during hot stretches, so don’t assume the same watering schedule you’d use for an in-ground plot will work here.
Check the top 1 to 2 inches of soil with your finger. If it feels dry, it’s time to water. Water slowly and thoroughly until you see some drainage from the bottom, which helps confirm moisture is reaching the root zone rather than just wetting the surface.
Potatoes are heavy feeders, particularly when it comes to nitrogen, phosphorus, and potassium. A balanced fertilizer with a nutrient ratio like 5-10-10 works well, applied every couple of weeks once shoots emerge. Look for a formula with a higher middle number, since phosphorus supports strong tuber development more directly than nitrogen alone. Organic growers can substitute a mix of fish emulsion, kelp meal, and bone meal instead.
Avoid any fertilizer labeled “weed and feed,” since the herbicide in those products will damage or kill vegetable plants.
Sunlight and Temperature Needs
Consistent sunlight is non-negotiable for a decent harvest. Position the container where it gets a minimum of 6 hours of direct light, with 8 hours being closer to ideal.
Dark-colored containers, like black plastic bins, absorb extra heat, which can actually help speed up early growth in cooler climates. In hot summer regions, though, that same heat absorption can overheat root zones and stress the plant. If your container sits in full afternoon sun during a heat wave, consider providing a bit of light shade during the hottest part of the day or wrapping the exterior with a light-colored cloth to reflect heat.
Soil temperatures above 80°F can actually slow down tuber development, so this isn’t just a comfort issue for the plant. It has a direct effect on how many potatoes you’ll pull out at harvest time.
Common Pests and Problems to Watch For
Container growing sidesteps a lot of soil-borne issues, but a few problems still show up regularly.
- Colorado potato beetles. Check the undersides of leaves regularly for clusters of small orange eggs, and hand-pick adult beetles when you spot them.
- Aphids and thrips. A layer of light-colored straw mulch on top of the soil can help discourage these small pests.
- Potato scab. Rough, corky patches on the skin are usually cosmetic rather than a sign the potato is unsafe, and keeping soil pH on the acidic side helps prevent it.
- Rot from overwatering. Soggy, waterlogged soil is one of the fastest ways to lose a container crop, so good drainage holes are essential from day one.
- Greening. Any tuber that develops a green tint from sun exposure has also developed a bitter, mildly toxic compound called solanine, so any green portions should be cut away and discarded rather than eaten.
Other Container Growing Systems Worth Trying
The classic bucket-and-hilling method isn’t the only way to go about this, and a few alternative setups are worth knowing about, especially if you want to experiment.
- Grow bags. Fabric bags drain exceptionally well and are easy to fold flat for storage during the off-season.
- Straw-only systems. Some gardeners skip soil almost entirely, layering seed potatoes directly into loose straw inside a container and continuing to add straw as the plant grows.
- Repurposed bins. Garbage cans and large plastic totes work fine as long as multiple drainage holes are added to the bottom before filling with soil.
Whichever system you choose, the underlying principle stays the same: keep adding growing medium around the stem as the plant reaches upward, since that’s exactly where new tubers form.
Harvesting Your Container-Grown Potatoes
Patience pays off here. There are two harvest windows worth knowing about.
“New” potatoes can be gently harvested once the plants begin to flower, usually 6 to 8 weeks after planting. These are smaller, thinner-skinned, and best eaten within a few days since they don’t store well.
Mature potatoes are ready once the foliage turns yellow and starts to die back, typically 10 to 14 weeks after planting depending on the variety. At this point, stop watering and let the container sit for about a week, which allows the skins to toughen up for storage.
To harvest, spread a tarp on the ground, then tip the entire container over onto it. Sift through the soil by hand to find the tubers, working gently since fresh potatoes bruise easily. This tip-and-sift method is one of the biggest advantages of container growing compared to digging through garden rows with a fork.
Curing and Storing Your Harvest
Freshly dug potatoes aren’t quite ready for long-term storage right out of the container. Brush off excess soil, but don’t wash the tubers yet, since moisture encourages rot.
Let the potatoes cure in a dark, well-ventilated spot for about one to two weeks. This curing period toughens the skin and helps minor scrapes heal over, both of which extend how long the potatoes will keep. After curing, store them in a cool, dark location such as a basement or pantry, ideally somewhere between 45 and 55°F. Avoid the refrigerator, since cold temperatures can convert the starches into sugars and affect flavor and texture.
Container Potato Growing at a Glance
| Stage | Timing | What to Do |
|---|---|---|
| Prep seed potatoes | 1–2 days before planting | Cut into pieces with eyes, let calluses form |
| Planting | ~2 weeks before last frost | Add soil, place seed pieces, cover, water |
| Sprouting | 10–14 days after planting | Keep soil moist, watch for green shoots |
| Hilling | Every time shoots reach 6–8 in. | Add soil, compost, or straw around stems |
| Feeding | Every 2 weeks once shoots emerge | Apply balanced fertilizer such as 5-10-10 |
| New potato harvest | 6–8 weeks after planting | Gently dig around plant base for small tubers |
| Full harvest | 10–14 weeks after planting | Wait for foliage to yellow, then tip and sift |
| Curing | 1–2 weeks post-harvest | Store unwashed in a dark, ventilated spot |
Pros and Cons of Growing Potatoes in a Container
Pros
- Requires no yard space, just a sunny patio or balcony
- Naturally deters many soil-dwelling pests
- Easier, cleaner harvest compared to digging garden rows
- Full control over soil quality, drainage, and pH
- Containers can be relocated to chase sun or dodge frost
Cons
- Generally lower yield per plant compared to in-ground growing
- Requires more frequent watering than garden beds
- Tall, narrow containers can dry unevenly if not chosen carefully
- Needs consistent attention to hilling throughout the season
Expert Tips for a Better Harvest
- Don’t skimp on hilling. Skipping even one round of hilling is one of the most common reasons container harvests come up smaller than expected, since exposed stem sections simply can’t produce tubers.
- Rotate your soil mix each season. Reusing the exact same container soil year after year without refreshing it with new compost can lead to nutrient depletion and a higher risk of disease buildup.
- Match variety to your timeline. Early-maturing varieties are a smart pick if you’re working with a short growing season or want a faster turnaround for a second planting.
- Don’t rush the cure. Skipping the curing period before storage is a common reason potatoes spoil faster than expected.
- Start a second container two to three weeks after the first. Staggering plantings this way spreads out your harvest instead of getting everything at once.
Frequently Asked Questions
How many potatoes can I get from one container?
A single 15-gallon container with two to three seed potatoes can realistically produce several pounds of tubers under good conditions, though the exact number depends heavily on variety, sunlight, and how consistently you hill and water throughout the season. Skipping hilling rounds or letting the soil dry out repeatedly during flowering are the two most common reasons a harvest comes in lighter than expected. It’s typically less than you’d get from the same number of plants in open garden soil, but still a worthwhile harvest for the amount of space required.
Can I use a 5-gallon bucket to grow potatoes?
Yes, a 5-gallon bucket can work for a single plant, as long as you drill several drainage holes in the bottom first. Just know that a smaller container tends to limit both root space and yield compared to the larger 15-gallon size typically recommended, so expect a modest harvest rather than a bumper crop. If you’re short on space but still want a bigger yield, consider lining up several 5-gallon buckets side by side instead of relying on just one.
Do I need to buy special seed potatoes, or can I use ones from my kitchen?
It’s best to use certified seed potatoes rather than ones from the grocery store. Store-bought potatoes are often treated with a sprout inhibitor specifically to keep them from sprouting on your counter, and they can carry diseases that show no visible symptoms but still affect your harvest later in the season. Certified seed potatoes cost a little more upfront but significantly reduce the risk of a failed crop, which makes them worth the extra expense for most first-time growers.
Why are my container-grown potatoes small?
Small tubers are usually a sign of insufficient hilling, inconsistent watering, or not enough sunlight during the growing season. Double-check that your container is getting at least 6 hours of direct sun daily and that you’re adding soil around the stems every time new growth reaches 6 to 8 inches tall. Overcrowding is another common culprit; planting too many seed pieces in one container forces the plants to compete for the same limited nutrients and water, which usually results in a larger number of undersized potatoes rather than fewer, bigger ones.
Can I grow potatoes in a container indoors?
It’s possible, but challenging, since potatoes need significantly more direct light than most indoor spaces naturally provide. If you want to try it, a spot near a very bright south-facing window or under a dedicated grow light is essential, along with the same drainage and soil requirements used outdoors. Indoor growing also removes natural temperature swings and pollinator activity, so expect the process to take a bit more monitoring than an outdoor container would.
Final Thoughts
Growing potatoes in a container comes down to three habits done consistently: start with loose, well-draining soil, keep the plant watered without letting it sit soggy, and hill up fresh soil every time the shoots stretch a few inches taller. None of it requires special equipment or a green thumb passed down through generations. It just requires showing up every week or two with a bag of compost and a watering can.
If you’re new to growing your own food, this is a genuinely good place to start. It’s low-risk, doesn’t demand a big garden bed, and gives you a satisfying, hands-in-the-dirt harvest day when you finally tip that container over and see what grew.